Overview
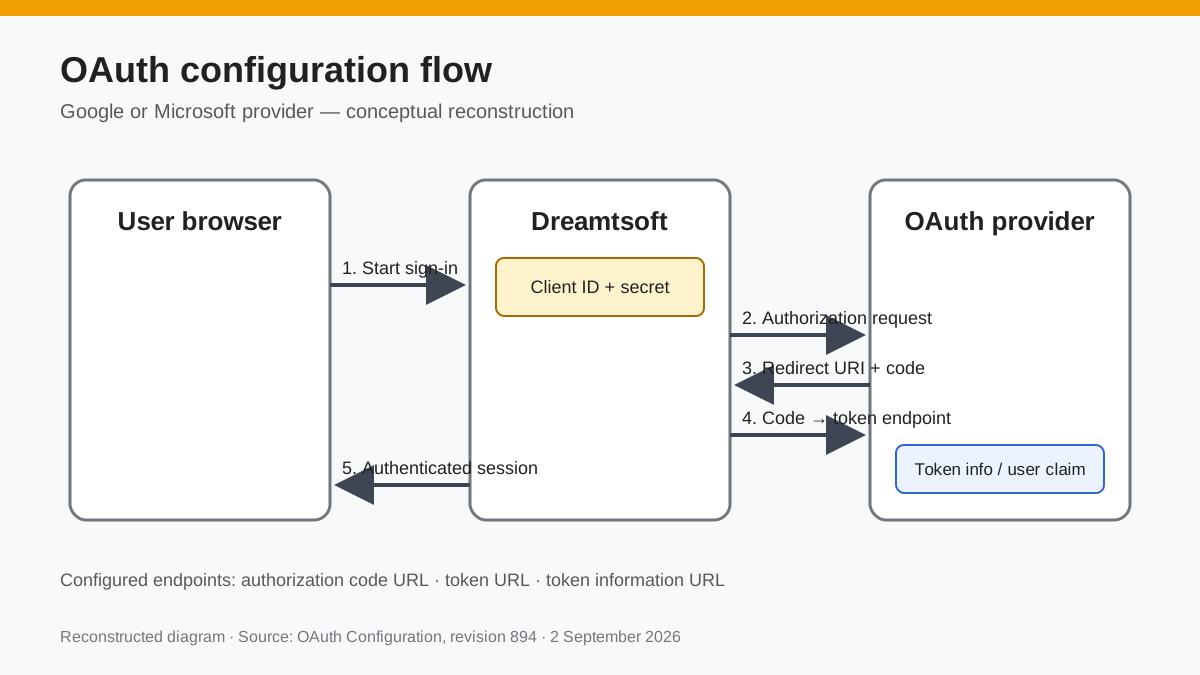
In Dreamtsoft you can use OAuth or SAML for single sign on. This article will go through OAuth configuration.
This article will walk you through setting up a Google OpenID Connect and will reference the Google OpenID documentation . Here are two helpful links for finding the correct endpoints:
Google OpenID: https://developers.google.com/identity/openid-connect/openid-connect
Microsoft Azure OpenID: https://learn.microsoft.com/en-us/entra/identity-platform/v2-protocols-oidc
To navigate to the OAuth configuration page, go to your system bundle, click the hamburger then user management, under authentication you will see the options of SAML, OAuth, and LDAP. Click on OAuth then the plus to add a new configuration.
First, make sure you have a user created in Dreamtsoft and your application is registered with your provider (Microsoft, Google, Amazon etc). Once registered you will receive your client ID and Client Secret. Keep these handy as you will need them when you put in your client information.
Google OAuth
Google OAuth Configuration
User slot is set to User ID with the JSON web token claim set to email. This means that in the User ID slot will expect an email to be the users unique identifier. another common example of a public claim is “name”.
- Note: In the provider dropdown you will notice Microsoft Azure v1.0 and v2.0. The only difference on the form is that if you choose v1.0 a mandatory field resource URL will show up. In v2.0 this field is no longer required.
Google OAuth Endpoints
For help finding the proper OAuth endpoints please refer to your provider documentation. In this article the Google OpenIDConnect document will be referenced.
Auth Code URL:
Auth Token URL:
Token Info URL:
Here is an overview example of what your form may look like once you have filled out your endpoints:
Client
When you register your application with your provider you will be given a unique client or Application ID. This is what you will put in the client ID field. You will also be given a secret, this will go in the Client secret field. Your Redirect URI will be generated for you automatically upon saving your page once all mandatory fields are filled in. You will see the Redirect URI field render in the client tab after saving.
In Google API's and Services under credentials you can find your Client ID and Client Secret.
Parameters
Scope - Scopes will depend on your provider. Refer to your providers documentation on scopes.
Prompt - Checked will give you the option to select account, give consent to the account being used, or login.
- consent The authorization server prompts the user for consent before returning information to the client.
- select_account The authorization server prompts the user to select a user account. This allows a user who has multiple accounts at the authorization server to select amongst the multiple accounts that they may have current sessions for.
If no value is specified and the user has not previously authorized access, then the user is shown a consent screen.
Microsoft Azure
Azure OAuth Configuration
User slot is set to User ID with the JSON web token claim set to mail or userPrincipalName. This means that in the User ID slot will expect an email to be the users unique identifier. another common example of a public claim is “displayName”. Note: Azure uses the Graph API for user identification. You can use the Graph Explorer to see and test out the Graph endpoints. https://developer.microsoft.com/en-us/graph/graph-explorer#
Azure OAuth Endpoints
Here is an overview example of what your form may look like once you have filled out your endpoints:
Microsoft Azure v2.0
Microsoft Azure v1.0
Client
When you register your application with your provider you will be given a unique client or Application ID. This is what you will put in the client ID field.
Your Redirect URI will be generated for you automatically upon saving your page once all mandatory fields are filled in. You will see the Redirect URI field render in the client tab after saving.
Hostname mapping:
No Hostname mapping:
In Microsoft Azure Active Directory under App registrations you can open your registered application and open Certificates & secrets to add and copy a Client secret. This will go in the Client secret field.
- Note: You may want to keep a copy of your client secret. Once it is closed you cannot open and see it again. You would have to create a new one and update your OAuth Configuration with the new secret.
Parameters
Scope- Scopes will depend on your provider. Refer to your providers documentation on scopes.
Prompt - Checked will give you the option to select account, give consent to the account being used, or login.
- consent - The authorization server prompts the user for consent before returning information to the client.
- select_account - The authorization server prompts the user to select a user account. This allows a user who has multiple accounts at the authorization server to select amongst the multiple accounts that they may have current sessions for.
If no value is specified and the user has not previously authorized access, then the user is shown a consent screen.
Reconstructed diagram
Reconstructed diagram: this is a new conceptual visualization based on the preserved article text, not an original archived screenshot.