Overview
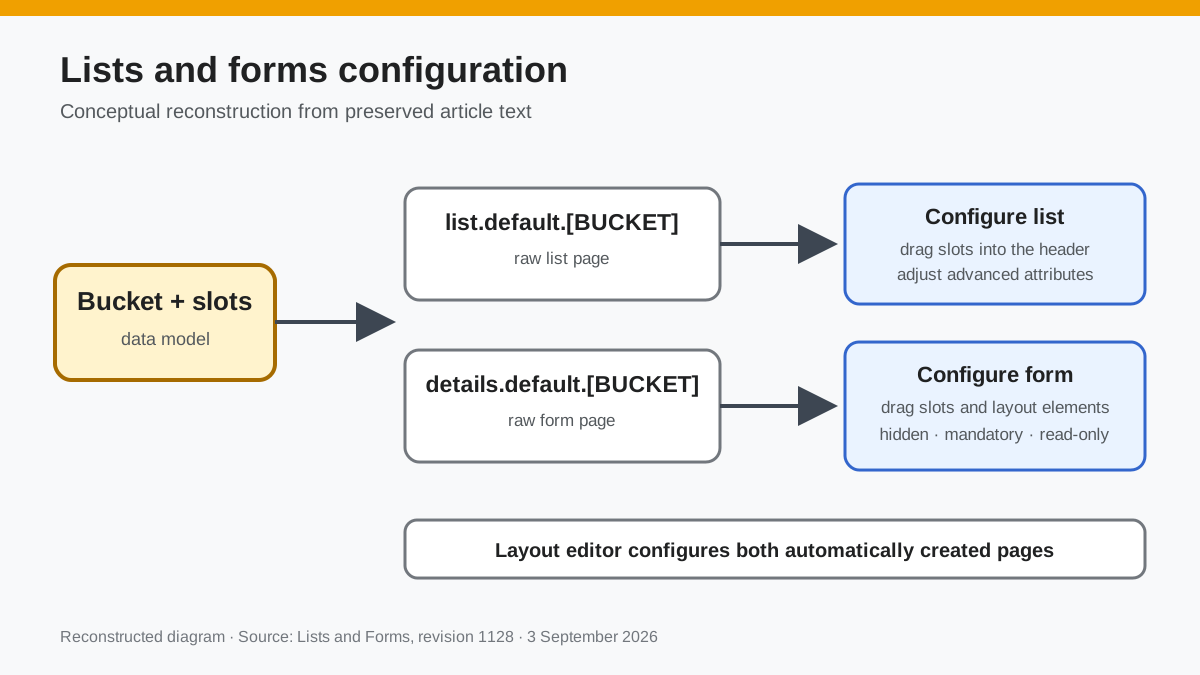
Once you have created your data model by creating buckets and slots you will need to configure how you interact with that data. When a table is created there are 2 pages that are created automatically.
- list.default.[BUCKET NAME] - A raw list view of the table data
- details.default.[BUCKET NAME] - A raw form view of the record data
Configuring the List Page
In order to configure both the list view and form view we will need to access these pages. From your bucket definition screen you can click the ... to expose the "Show data" button. This will take you to the list.default.[BUCKET NAME] page.
You can also navigate to the page by simply appending list.default.[BUCKET NAME] to the end of the URL
http://dreamtsoftinstance.com/s/SM/dev.myapp/list.default.expense
When you arrive at the list page you will see a page that contains a raw list component that needs to be configured. Click admin tools' pencil in the bottom of the left navigator. This is the layout editor that allows you to customize pages and the components on those pages. You will see a menu item with the name of the page (list.default.[BUCKET NAME]) and below it a component called list. Click the list component to configure the list.
To add default columns to your list view, simply drag the Slots from the columns section to the header section of the list. For more advanced features click the advanced tab and adjust the attributes.
Configuring the Details (Form) Page
To navigate to the details page click on the + icon on the list page to create a new record.
You can also navigate to the details page by simply appending details.default.[BUCKET NAME] to the end of the URL. However, the details component requires a GUID parameter to display an individual record (e.g. ?q=cd59fcbd261e4baba18559534d906001) but to display a new record you need to add the ?new=true parameter.
http://dreamtsoftinstance.com/s/SM/dev.myapp/details.default.expense?new=true
When you arrive at the new record page you will see a page that contains a raw details component that needs to be configured. Click admin tools' pencil in the bottom of the left navigator. This is the layout editor that allows you to customize pages and the components on those pages. You will see a menu item with the name of the page (details.default.[BUCKET NAME]) and below it a component called details. Click the details component to configure the form.
To add slots to the details page simply drag the slots from the left column to the right canvas pane. To format the form with 2 columns you can drag a new two-column on the page and then drop slots inside the two-column.
In addition to adding slots to the details component, you can also drag the following from the left column
- Action bar - Custom buttons placed on the form
- Annotation - Text to provide form instructions
- Attachments - Section to display attachments
- Divider - Line to separate sections
- Relationships - A special section to display any relationships to other records
Adding display rules to the details component
Often times you will need to make slots hidden, mandatory, or, read-only based on the values of certain slots. To apply these display rules to slots on the details component click the tile icon in the upper right of the details canvas.
The display rules screen will show a list of slots and any slots with an active rule will have a check next to it. To add or change a display rule check the box next to the desired slot and then toggle the type of rule you want to set (hidden, mandatory, read-only)
Reconstructed diagram
Reconstructed diagram: this is a new conceptual visualization based on the preserved article text, not an original archived screenshot.